This article is a deep dive on the functionality in the request section. There are a few areas to discuss, so we have divided the deep-dive up into smaller sections, to keep the articles useful to navigate.
Creating a requests
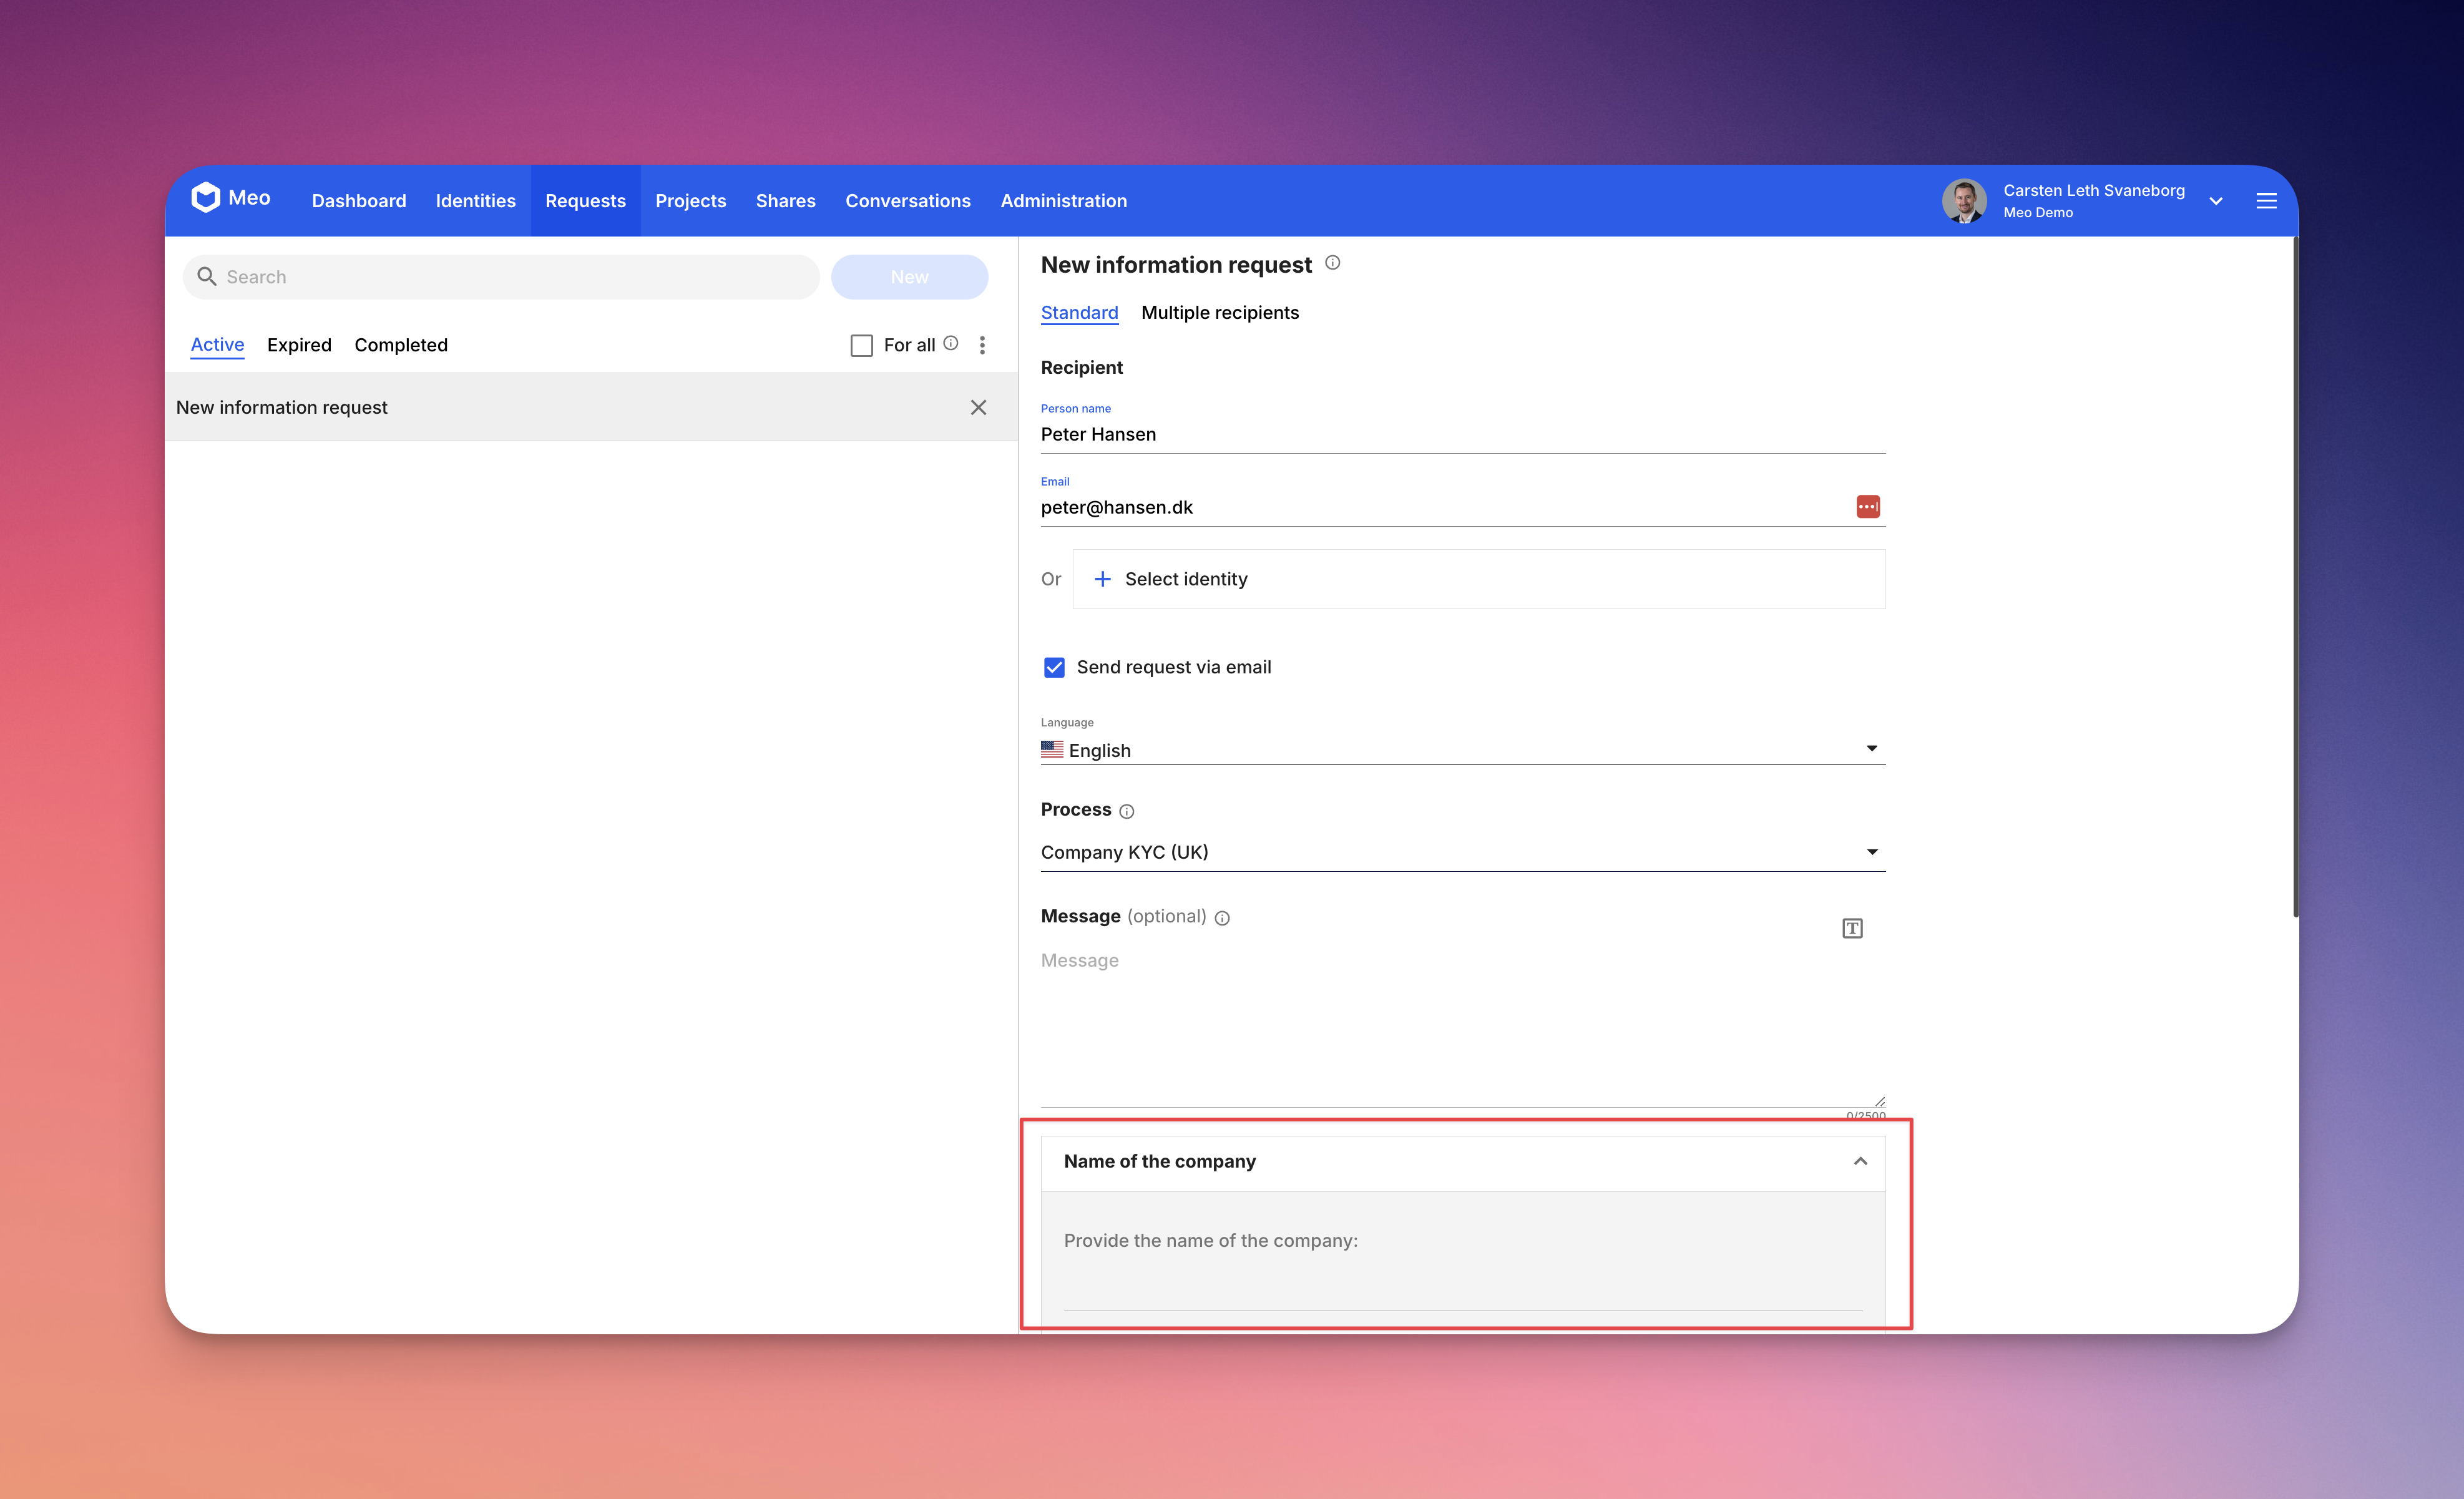
You can get a basic introduction to creating a request in our basic article How do I request information from a client?
In this section, we will dive a bit deeper into some of the more advanced features. These includes:
- Locations to create a request from
- The message, templates and variables
- Landing pages
- Email server integration
Locations to start a request from
A request can be started from the following locations:
Through the Requests section
This is the main section for requests, so naturally you can create a normal data collection request from here.
Through the company contacts data
After a company has completed a KYC request, then the UBOs have been identified. These UBOs need to be verified, which entail sending a request to them (if you have not already received their personal identification data).
To use this, you need to:
- Navigate to the company identity
- Locate the “Company contacts” data. It is in the documents section and would typically have the name of the company.
- Opening it, will show you all of the email addresses provided by the client
- For each email address, there is a ‘Request’ button. This will open the request form for you to send a request to the person.

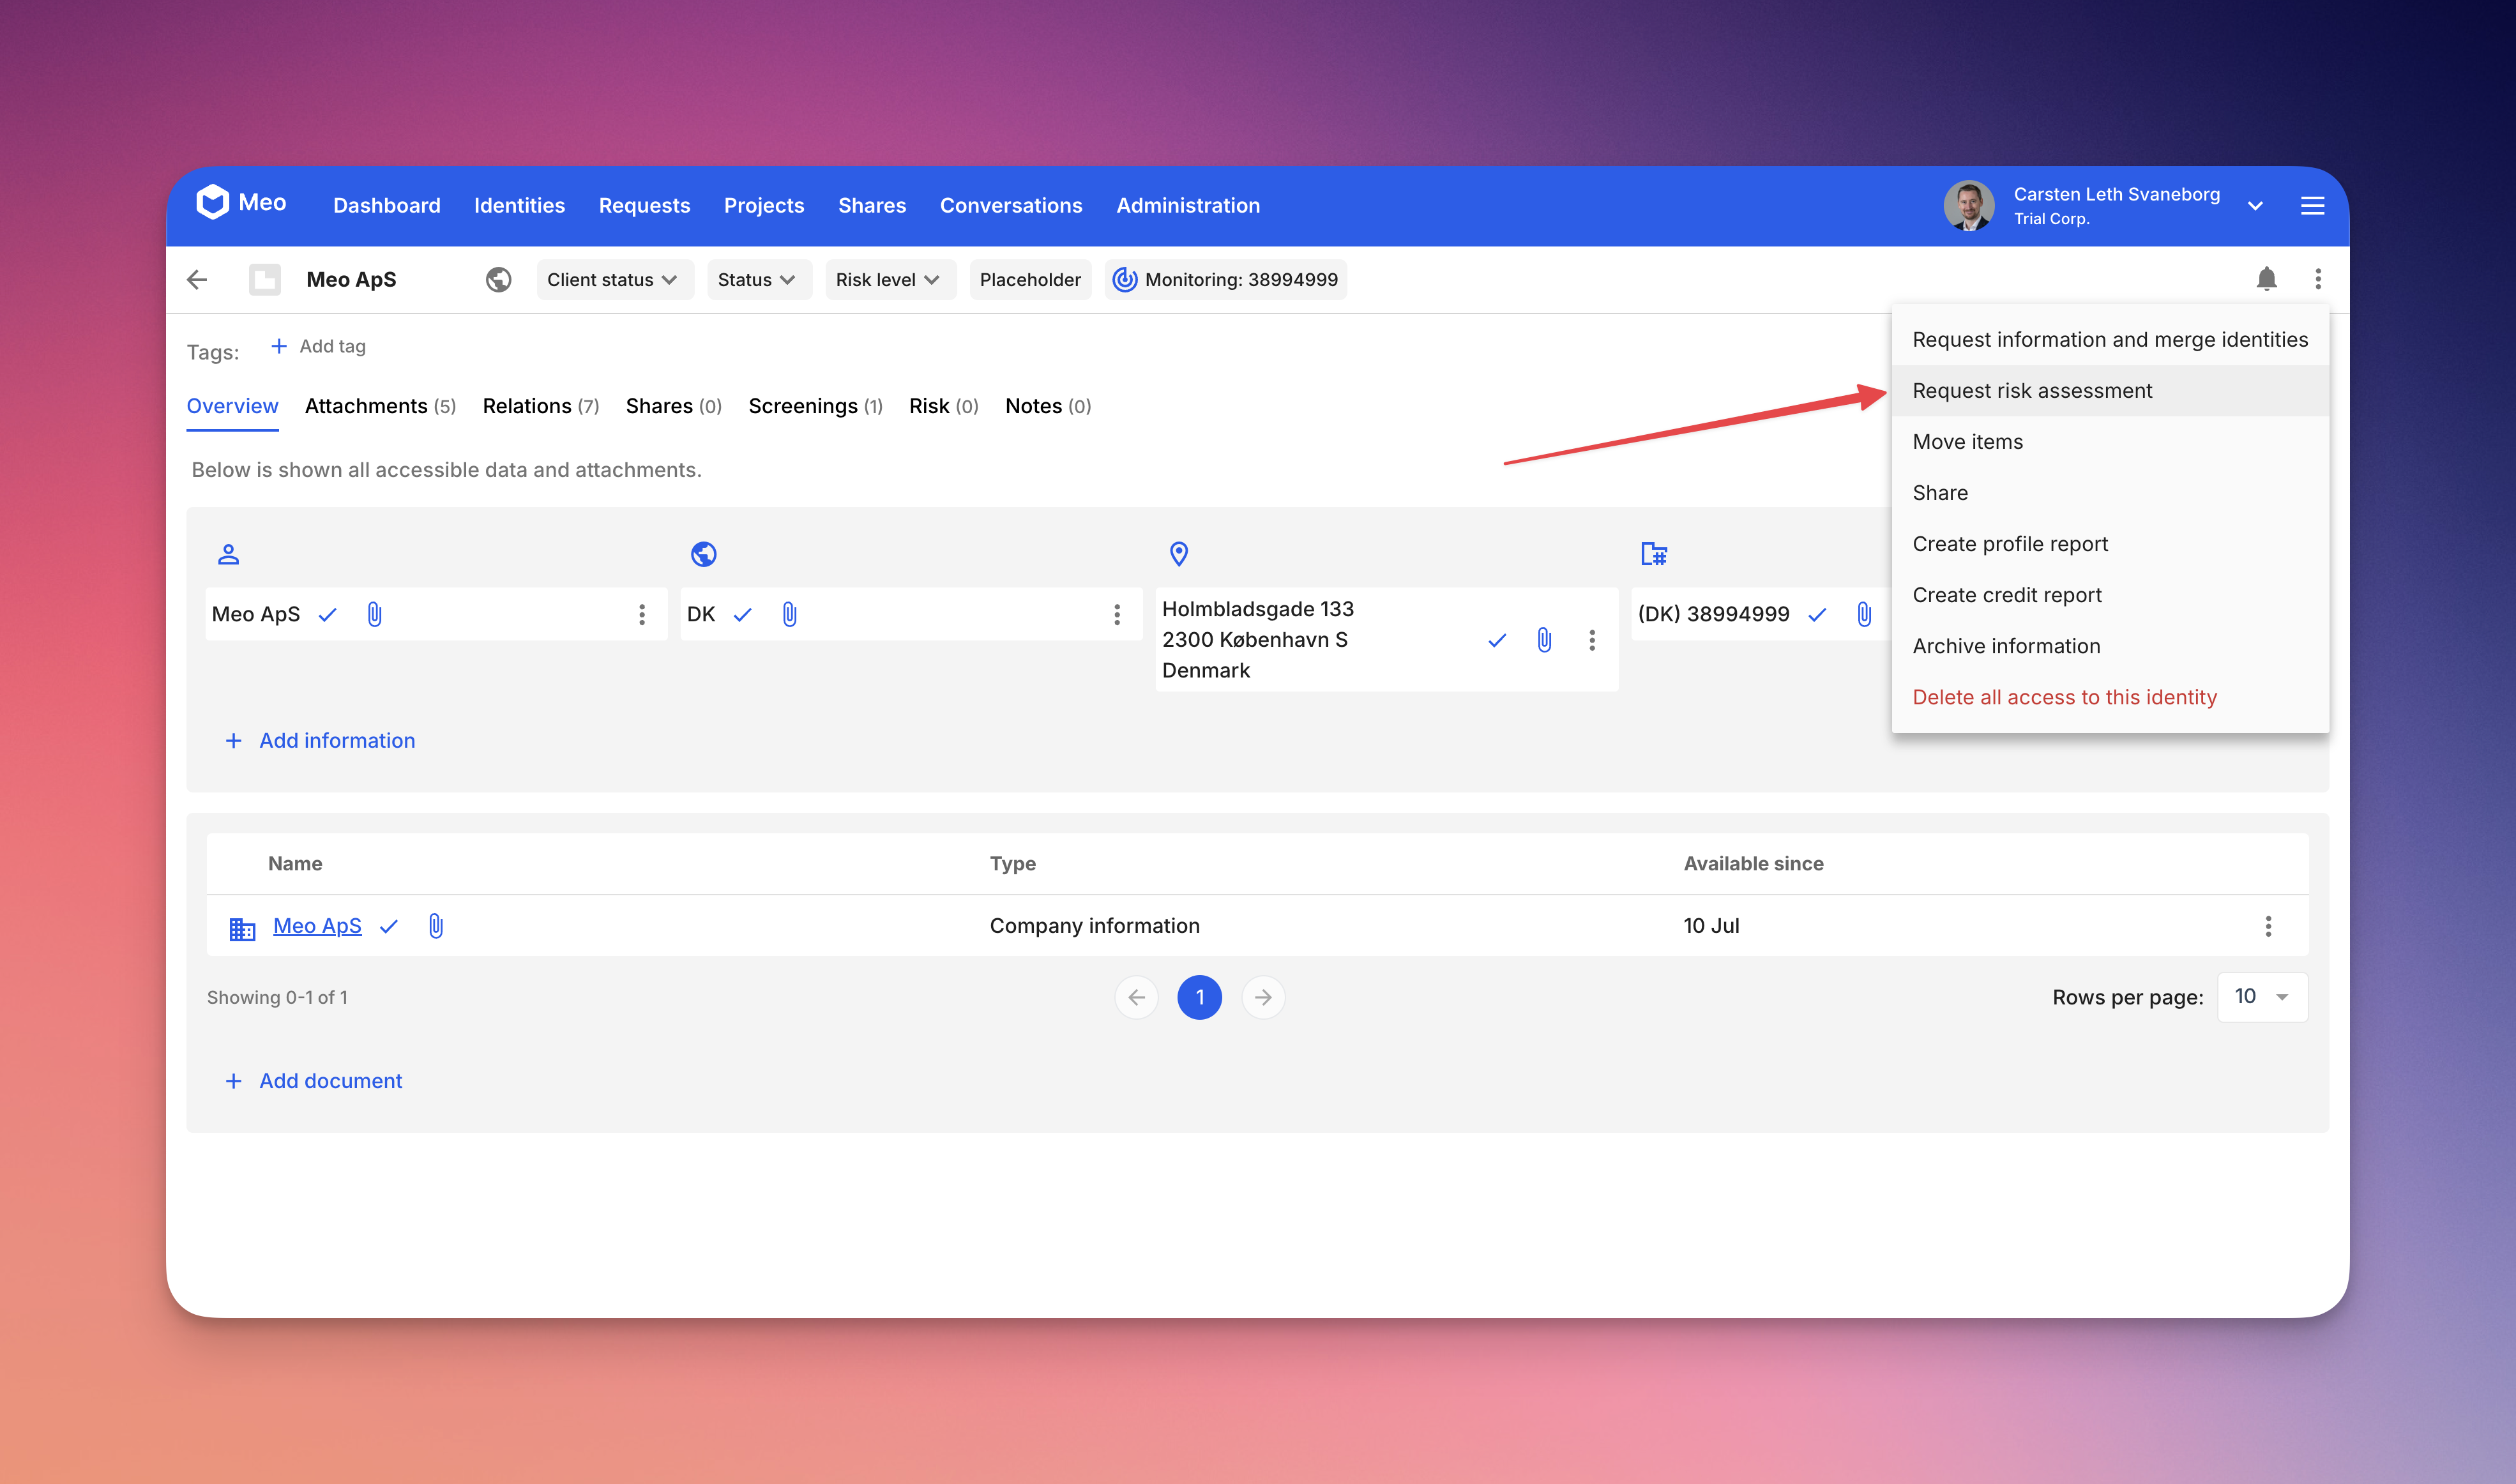
Through an identity (person or company)
You can also start a request for more information, from the person or company directly. Do to this, you would simply click the action menu on the top right, and select ‘Request more information’. The name of this action is slightly different depending on the context, it could be called:
- Request more information
- This is the standard option to get more information from a client.
- Request information and merge identities
- This is the automated process of requesting information from a client and merging the placeholder identity together with the actual client profile. This will make sure that you do not have duplicates afterwards.

- This is the automated process of requesting information from a client and merging the placeholder identity together with the actual client profile. This will make sure that you do not have duplicates afterwards.
For a company that is owned by a contact person(UBO or not), then there is not a ‘Request more information’. For this action, you need to request more information from the owner/contact person of the company.
There are two more request types that you can do from a profile:
- Risk assessment requests (requires setup on your account)
- Approval requests (requires setup on your account)
Risk assessment requests are used to get a person external to your workspace, to complete a risk assessment. Typically this could be a partner or case-responsible person at a law firm. They have the responsibility of owning the risk classification of the client, so it is possible to get them to do it.
By using this, the risk assessor will get a request via email (just like a normal request), and will then be guided through a custom risk assessment flow. The benefit of this approach is that the risk assessor will not get access to all of the clients for the firm.
Approval requests are used to get the partner or case-responsible person to approve the KYC procedures. Essentially this creates a PDF report that the approver will digitally sign with their Meo account. The PDF report is compiled as an overview of the client profile, some of the elements are:
- Risk assessment (made by the compliance officer)
- Personal ID data of the client
- Result of PEP, sanction list and adverse media screenings

The approver would then get a time-limited access to the specific report and will then digitally approve it with their Meo account. They can also reject the request for approval, with a comment to explain why the approval request got rejected.
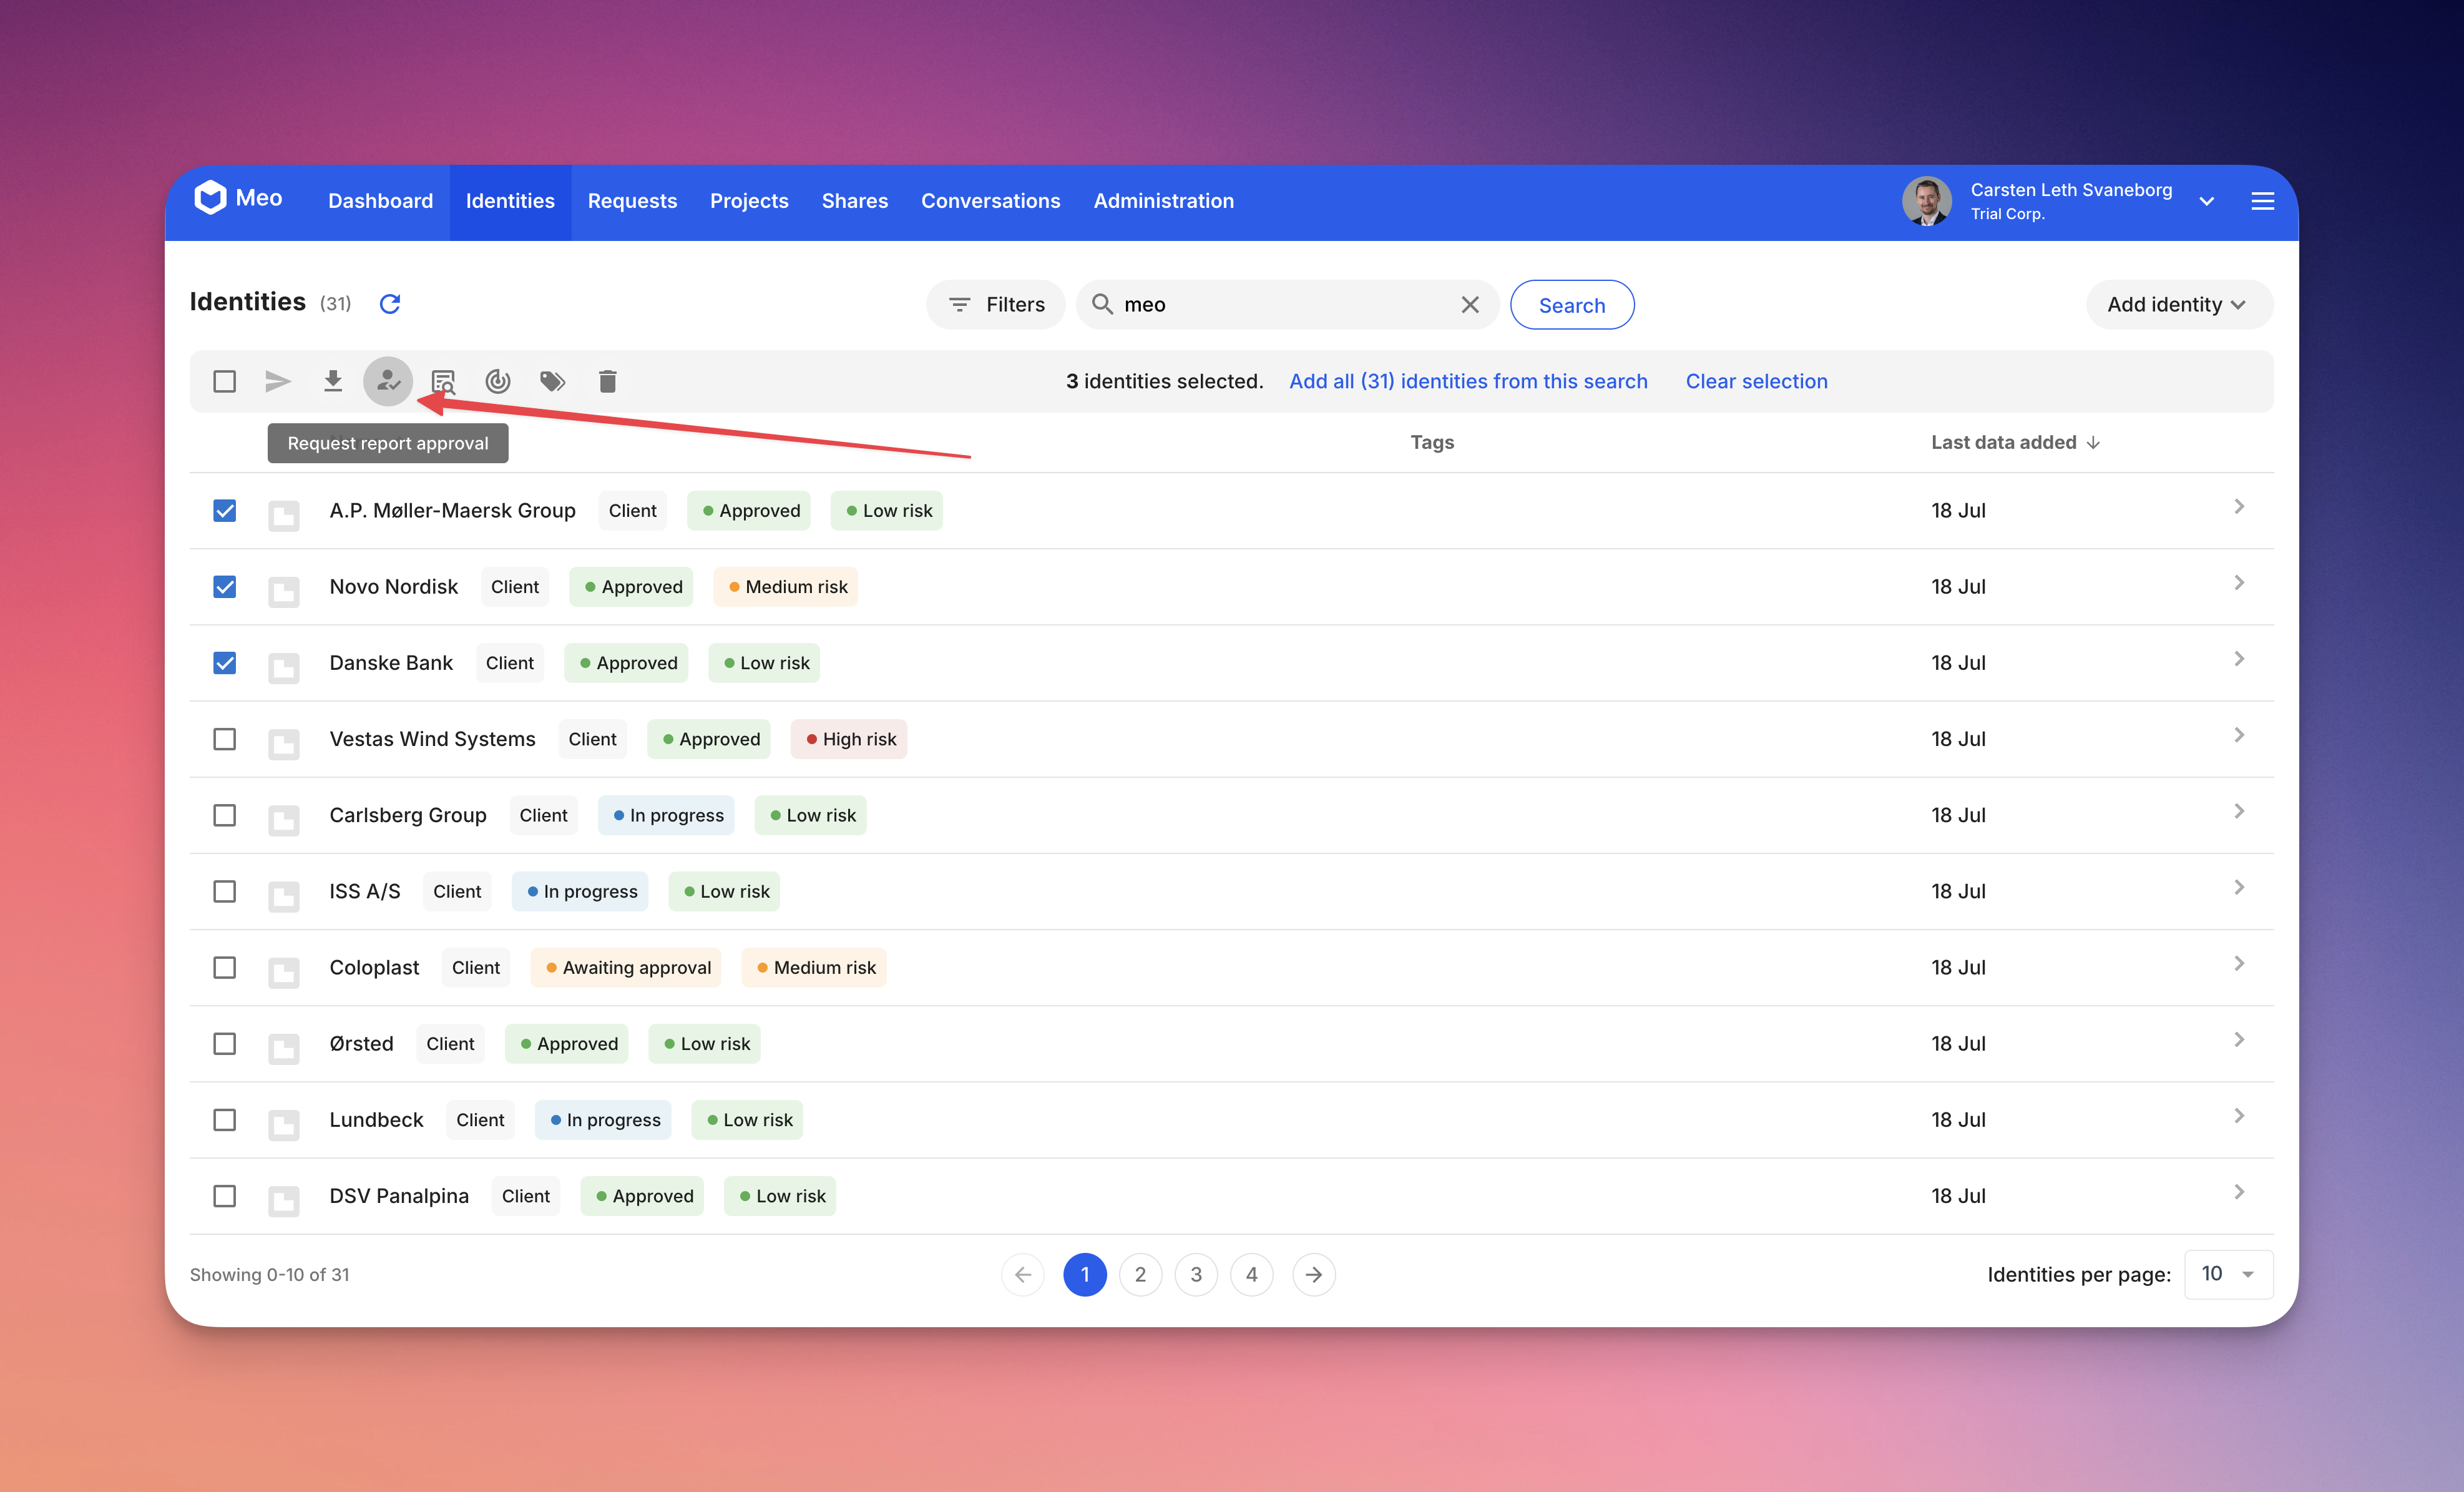
The approval requests can also be created from the identities section. This is the primary way, as you can take multiple identities at once (both persons and companies). Therefore you can request approval on the company, the contact person and the UBOs from the case-responsible person.
Life cycle for a request
After creating a request, it will essentially be in one of the following stages:
- Active
- Expired
- Completed
A request is active from the point of creation. This is when the request will be possible to complete for the recipient.
Active requests
While the request is active, it will typically send reminders out at a given interval. We say typically, because this is also something that you can decide when creating a request. See this article for more on the creation of requests.
Every active request that has been sent via email, will have a status indicating the recipient status of the request - read more about the email status here.
You can find the settings for how long the request should be active, and the frequency for how often it should send the recipient a reminder. The settings for the active period of a request consists of two values:
- Reminders, this consists of two parameters:
- How many reminders should be sent in total?
- How many days should there be between reminders?
- Duration after last reminder - how long should the request be active, after the last reminder has been sent
Thus, a request will be active, for the following days:
(amount of reminders) x (days between reminders) + (duration after last reminder) = the period that the request will be active.
The default values are:
- 3 reminders
- 7 days between reminders
- 14 days active after the last reminder

Note that if you change this frequency, then the system will reminder the selection and use that as the default going forward. Therefore, you only need to customize the frequency once, and then the system will use your preferences going forward.
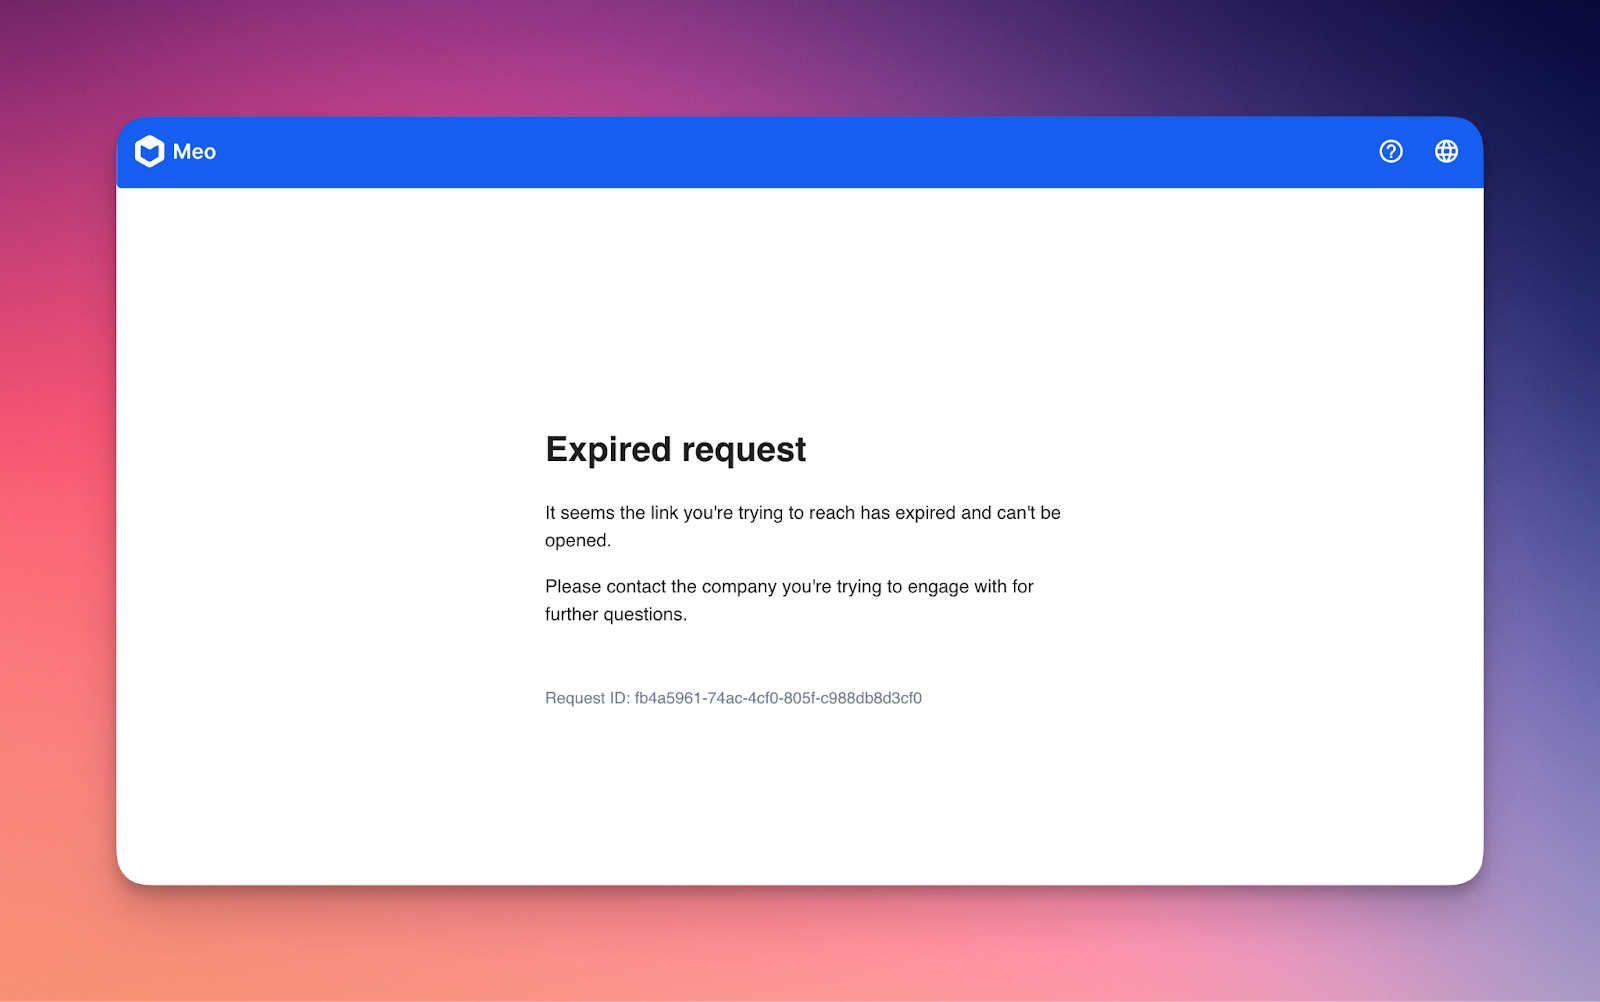
Expired requests
If the recipient did not complete the request within the active period, then the request will expire. An expired request cannot be completed. You therefore need to take some action on this. These actions would be either:
- Renew the request - let the client have a chance to complete the request again. You can send a new message to the client to e.g. warn them of the consequences if they do not comply with the request for KYC information.
- Delete the request - if the client did not complete the request, that could mean that they provided the data through another channel or there could be other reasons. For these cases, you can then delete the request.
Expired requests will give a little red notification on the top of your account, to alert you of the fact that a recipient failed to respond to your request for KYC information.
An expired request will look like this to the recipient:
Completed requests
We are keeping a record of the completed requests, so that you have an easy overview of which clients have completed a request, when they did so and what they provided. This is useful for an overview and for keeping a record of.
Processes
Please see our deep dive article on processes.
“Dynamic parameters”
It is possible to set up a process, so that it can be configured to the specific case. This configuration can change a lot of the requirements, so the specific parameter must be agreed when setting up the processes.
Some of the typical dynamic parameters are:
- Prefilling a company name for when the client will create their company
- Prefilling a company registration number, so that the client will have an easier time with onboarding and so that you make sure that the client is using the correct company (e.g. a person might have multiple holding companies, etc.)
- Deciding if the verification requirements should be lowered or increased for this particular client - typically based on a preliminary risk assessment.
- Deciding which documents are required for onboarding a client